1) About Sales Syntax [back to top]
Sales Syntax is an open source customer relationship management solution that helps customer
support with live help functionality that can be proactively pushed to
visitors to your site or requested by the consumer. Sales Syntax includes
a large range of features to allow multiple operators, multiple departments
and multiple languages to be used.
Sales Syntax Live Help is free and is progammed in PHP with Mysql for the
datatabase. Other highlighted features include the ability to create your
own questions, auto inviting visitors, referer tracking, page tracking,
ability to view what the customer is typing as they type, multiple chat
sessions, sound alert, leave a message if offline, push urls, quick responses,
Customizable graphics, and multiple operators. runs on your server and is open
source GPL.
2) How to INSTALL Sales Syntax [back to top]
Installation is very easy:
NOTE: If you need help with installation or would like professional
installation on your webserver you can request installation by e-mailing
csyntax
3)How to UPGRADE Sales Syntax [back to top]
All that is required to upgrade is simply upload all
the files included in the archive EXCEPT config.php over
the exisiting installation files and open up
setup.php in a web browser. Upon opening the setup.php file in
a web browser all the files and database alterations will be made
and the operator is not required to fill anything out!!!
The application will auto-detect what version is
currently running make any database alterations and
update evertything for you.
4) How to Register and enter in Registration code [back to top]
Security is *VERY* important to Sales Syntax. Security vulnerabilities are found in
open source programs everyday and not knowing about these vulnerabilities can be
catastrophic to your website. Although great efforts have been made to try to make
the code that runs Sales Syntax very secure, there is still the
possiblilty that a security hole could have been overlooked. By registering
your version of Sales Syntax you can be e-mailed on any updates
that are made to Sales Syntax Code and prevent attacks from hackers.
To Register:
- Click on the Registration icon found on the overview index page
- Fill out the Registration form and submit.
- After 5 to 10 minutes you will receive an e-mail with a registation
number like "fdsafd-f123342f" Select "Security Registration
from the Sales Syntax navigation Menu and submit the code on the
Security Registration page.
5)How to Place HTML code for department on Your webpage [back to top]
Click on the tab that Reads "Departments"
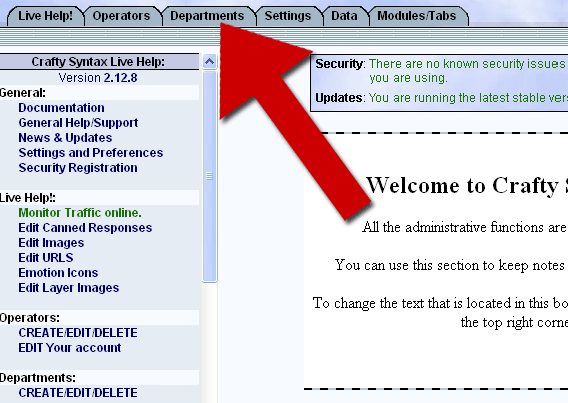
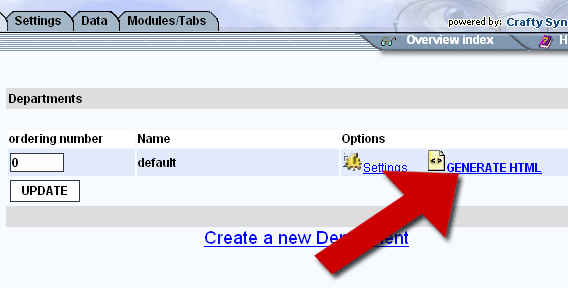
Click on the
link that reads GENERATE HTML next to the department you would like
to create the HTML code for.
Select what type of HTML you would like to generate and then click
CREATE. NOTE if you are unsure on what to select for the options
in generating the HTML code leave all the options at their default
selections and click on CREATE. The options are explained below.
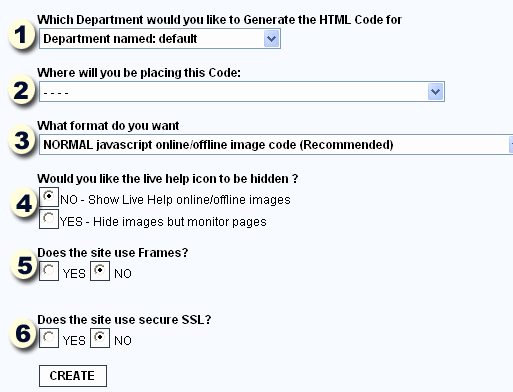
| Section |
Description |
| 1 |
Which Department would you like to Generate the HTML Code for
This option gives the operator the choice of which department
to generate the HTML code for. Each department can have its own
online/offline images, questions, operators. Optionally
there is an option to "Give the visitor a choice upon request"
If this option is selected the visitor will be given a choice of
which department they would like to contact when they request or
click on the help icon that is generated. |
| 2 |
Where will you be placing this Code
This option gives the operator the choice of generating one of
the following formats for the live help code.
On a webpage RELATIVE to the domain http://www.yourdomain.com/:
If this option is selected HTML code will be generated assuming that the HTML is
placed on the web page inside http://www.yourdomain.com/ if the HTML is not
placed on a page that is inside http://www.yourdomain.com/ the
Live help images will be BROKEN. NOTE A common mistake users
make is install Live help in a subdomain on their website such as
http://help.yourdomain.com/ and then select to generate the RELATIVE
code for placing on their site at http://www.yourdomain.com/ this will
NOT work as http://help.yourdomain.com/ is not RELATIVE to the domain
http://www.yourdomain.com/
On a website OUTSIDE the domain of http://www.yourdomain.com/ :
This is the RECOMMENDED choice to Use
This option will generate an absolute path to the live help icon and
can be placed on ANY WEBPAGE .
INCLUDING http://www.yourdomain.com/.
On Ebay or in an HTML e-mail message:
If this option is selected non-javascript HTML will be generated. This
options is for placing the live help icon on pages or e-mail messages
where javascript is not allowed. NOTE: No invite options or tracking
will work with this generated code. Visitors will have to click on the
live help icon to begin a chat.
In a Text e-mail message
This option will generate a simple link to the live help. No tracking
or invite options will work with this code.
|
| 3 |
What format do you want
It is recommended that a javascript code is generated as the most
features can be used with that format. However, if javascript can
not be used such as in e-mail messages or on ebay items you can
generate HTML code or links here. |
| 4 |
Would you like the live help icon to be hidden ?
Sales Syntax gives the option to monitor pages without
showing a live help online/offline image. Operators monitoring
pages with the hidden icon can invite the visitor to chat.
|
| 5 |
Does the site use Frames?
Sales Syntax gathers the current page information from the page
that the html code is placed on. If the site uses a frameset then
the information that is needed is actually in the parent frames
of the site.. If the site is using Frames then select YES here.
|
| 6 |
Does the site use secure SSL?
If the page that this code is generated on also uses a secure
HTTPS then select yes here.
|
6) How to Monitor Live Help traffic and Chat [back to top]
After placing the HTML code for live help on your webpages click on
the "Live Help" tab in the admin to start to monitor traffic and wait
for chat requests.
NOTE: You do *NOT* need to keep the live help
browser window maximized waiting for calls to come
in. You can minimize the Live help browser window and
do something else on the computer and when a call
comes in the window will auto focus and re-maximize
to get your attention as well as play a sound.
When a Chat request is made, the browser window will maximize
into focus and play a sound. You will then see a screen like
below (click image to magnify):
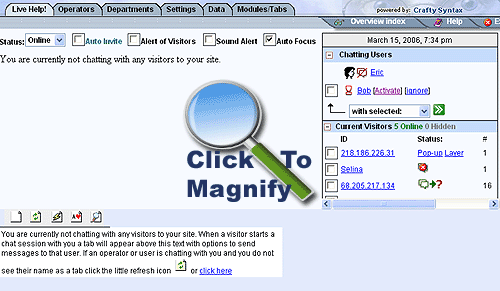
To activate the chat click on the link that reads activate
next to the users name. If another operator answers the request
before you you will get a notice that the chat request has been
already answered.
After accepting the call a screen such as below will show. You
will have tabs for each chat session that is active:
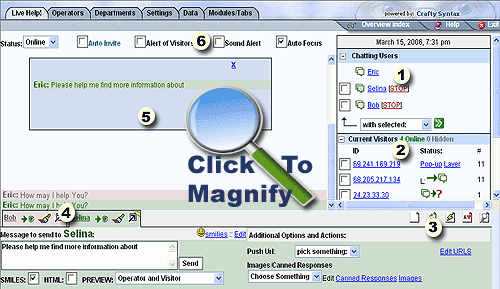
Sections explained:
| Section |
Description |
| 1 |
Chatting Users
The chatting users is a list of ALL users and
operators that are currently chatting. From this
screen you can activate, stop and join conversations
of chat sessions. |
| 2 |
Current Visitors
The current visitors is a list of the current people visiting
the webpages with the live help icon. From this
screen you can proactivly invite visitors to chat, View
what pages they are visiting and auto invite them to chat.
visitors with no invite request have the links "Pop-up Layer"
next to their ip address or username. Clicking on "Pop-up" will
give the operator a window to send the visitor a pop-up request.
However, Most pop-ups these days are blocked so this type of
request is supressed... "Layer" invites sends the request in
the form of a "layer" image which is not blocked by anti-popup
software.
The Status of the current visitors can be one of the following:
 | If this icon is shown the visitor has been invited to chat by either a operator or the auto-invite feature. The Visitor has not seen the request yet but Sales Syntax is attempting to contact them. |
 | If this icon is shown the visitor has received the chat request or has requested a chat and is currently viewing the "questions" page |
 | If this icon is shown the visitor has closed the invite request or has ended the chat. |
|
| 3 |
Chat Controls
The chat controls allows you to:
 | Clear the current chat text so that the chat window is cleared. |
 | Refresh the page and chat tabs to view new colors for tabs or updat the chat tabs. |
 | Option to reset/ clear current non-chat sessions. (Used mostly for sites with heavy traffic and debugging) |
 | option to play games while waiting for chat sessions.. Admins can disable this feature in the settings. |
 | option to search the web while waiting for chat sessions.. Admins can disable this feature in the settings. |
|
| 4 |
Chat Tabs/Sessions
The chat tabs allows you to:
 | Open Chat session in a NEW window. |
 | Change the color scheme of the chat session |
 | Refresh the chat screen to only view this chat channel. |
|
| 5 |
Chat
Each chat "channel" is noted in this chat screen with a different
color background. Operators can chat with multiple different visitors
and view all the chat sessions text in this window with each chat having
a different color background. Visitors can only see the text that is in
their own "channel".
|
| 6 |
Chat options
Auto Invite: When this is checked invite requests will be
made to visitors based on time online, pages visited , and referer.
Alert of Visitors: When this option is checked operators will be
alerted when someone new enters the site.
Sound Alert If this option is checked a wav sound will play
when a chat request is made. If this option is not checked then a javascript
alert box will be shown.
Auto Focus If this is checked then the chat window will auto focus
when the visitors type something in the chat for a reply.
|
|


